From Sketches to Blockbusters: Marco Gifuni on creature design, workflow mastery, and why he swears by RizomUV
With over two decades of experience in the world of VFX and animation, Marco Gifuni has carved out a name for himself as a Senior Creature Designer and 3D Generalist working on projects like The Matrix: Resurrections, Ghost in the Shell, and Venom: The Last Dance. In this exclusive interview, Marco shares insights from his creative journey, his love for all things monstrous, and how RizomUV became a game-changer in his technical workflow. Dive in to discover how he blends artistic vision with technical precision to bring unforgettable characters to life.
Introduction
Hi Marco, thanks for taking the time for this interview! To start, could you introduce yourself and tell us a bit about your journey into the world of 3D ?
Hey guys, thanks for having me!
My name is Marco Gifuni and I’m a Senior Creature Designer and 3D Generalist.
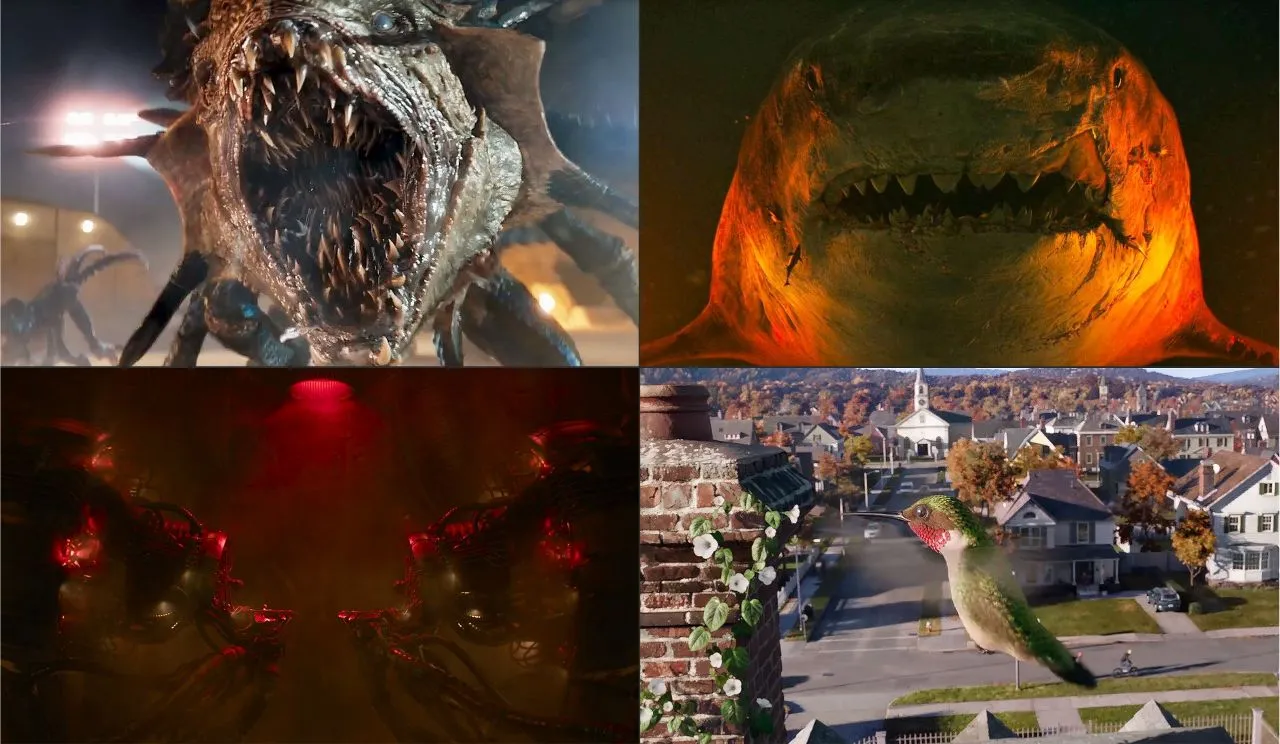
I started studying 3D in December 2003 and many years later I’m very fortunate to work in the same field. I relocated from Rome to London, UK, 15 years ago, as this city has always been a hub for VFX and digital arts. During my career I’ve been part of studios like MPC, The Mill and Dneg to mention a few and had the chance to work side by side with incredible artists in blockbuster productions such as The Matrix: Resurrections, Ghost in The Shell and Meg 2.
You have an impressive 20-year career spanning VFX, animation, and motion design. What initially drew you to this field, and how has your artistic approach evolved over the years?
My journey was a bit unusual, as I initially started working as a pen and paper illustrator, then moved to 3D modelling and motion design.
Since I’ve always loved characters and weird creatures, 3D was immediately alluring to me as it gave me the possibility of creating a richer version of something I was only used to seeing in a 2D space.
The very first thing I tried to create with a 3D software was in fact a character! I’ve developed a workflow during the years and I’d say getting used to it and figuring out the best steps when it comes to asset creation, was possibly the most challenging part. But I really love learning new skills so it wasn’t a burden at all. It was quite an organic evolution to expand and learn other programs that could benefit me in my day to day work as well. I also try to work on personal projects as much as I can, and that gives me an extra spark to keep performing on client work.
Your expertise covers a wide range of disciplines, from creature design to UV mapping. What aspects of your work do you enjoy the most, and what challenges do you find most exciting.
Thanks! I’d say the thing I enjoy the most is the creation of characters and assets. I love the complexity of coming up with a concept from scratch and developing it to completion. I also really enjoy the storytelling aspect of our work, it’s nice to be able to convey an emotion through visual mediums.
Fortunately the evolution of 3D applications in the last couple of decades has been huge, and that gave me the chance to explore other disciplines connected to 3D itself (uv mapping, animation, texturing, grooming, motion design and comp).
So I really love the fact that I can leap from software to software, and figure out what’s the best course of action for the creation of a project.
Specialization & Work
Your expertise covers a wide range of disciplines, from creature design to UV mapping. What aspects of your work do you enjoy the most, and what challenges do you find most exciting.
Thanks! I’d say the thing I enjoy the most is the creation of characters and assets. I love the complexity of coming up with a concept from scratch and developing it to completion. I also really enjoy the storytelling aspect of our work, it’s nice to be able to convey an emotion through visual mediums.
Fortunately the evolution of 3D applications in the last couple of decades has been huge, and that gave me the chance to explore other disciplines connected to 3D itself (uv mapping, animation, texturing, grooming, motion design and comp).
So I really love the fact that I can leap from software to software, and figure out what’s the best course of action for the creation of a project.
You’ve worked with some of the best studios and clients in the industry. Could you share a particularly memorable project that pushed your creative or technical limits?
One that springs to mind is Venom: The Last Dance.
I was assigned to work on the most complex character of the whole film, the Xenophage. It’s an incredible concept which I was lucky to contribute to, the creature had 4 sets of limbs, 3 tails, an incredible amount of teeth and was covered in quills like a porcupine. Very peculiar!
This took a lot of testing in the modelling stages and quite a few iterations, as I had to create something that was viable for the rig department, but at the same time had to conform to the concept and the director’s needs.
Rizom UV helped me a lot with the uv mapping side of things, as it allowed me to speed up that part of the process considerably.
Technical Workflow & RizomUV
You mentioned that almost all of your characters have been UV mapped with RizomUV. What initially led you to choose this software, and how does it fit into your workflow?
Yes! I would say that from 2017 onwards all of my characters and assets have been uv mapped with RizomUV (ex-Unfold 3d).
What attracted me to RizomUV is the capacity of making tedious processes quick and easy, giving you a result that is of the highest calibre. I still can’t believe how quick and precise packing operations are, and in film productions the requirements for uv mapping are extremely demanding. RizomUV responds to that need in a really efficient way. Plus it has tools that no other program offers for uv mapping operations, almost makes you wonder why nobody thought about them before! 🙂
RizomUV is known for its efficiency in UV unwrapping and packing. Could you walk us through how it has helped you optimize your UV workflow, particularly for complex character designs?
Sure! First of all the predictive selection tool is incredibly powerful, and saves so much time especially when uv mapping pretty big assets. Also as mentioned the uv packing tool was extremely helpful, I couldn’t have grouped a large number of uv islands so quickly with any other program.
This function in particular was instrumental in helping me dealing with large number of assets on projects like Heavenscale: League of Legends and The Matrix: Resurrections.
Are there specific features in RizomUV that you find particularly valuable? How does it compare to other UV mapping tools you’ve used in the past?
Absolutely! Topocopy is still one of the features I utilize the most in my work and personal projects. It happens very often that I’ll encounter the need to uv map multiple assets with the same topology and topocopy does that in a click. Such an incredible feature and what a time-saver!
Another incredibly useful feature is the Protect/Attract Map brush, often times there are areas of the model that I don’t want to select or unfold and it’s great to have something that prevents you from accidentally touching or working in those areas.
I could go on forever but just one last one, the Color ID map feature! It’s incredibly useful to be able to create an ID map based on materials or polygroups assigned to your asset, as you can use this map in other programs such as Substance or Redshift (as an additional texture to add a chromatic variety to your asset).
Breakdowns & Insights
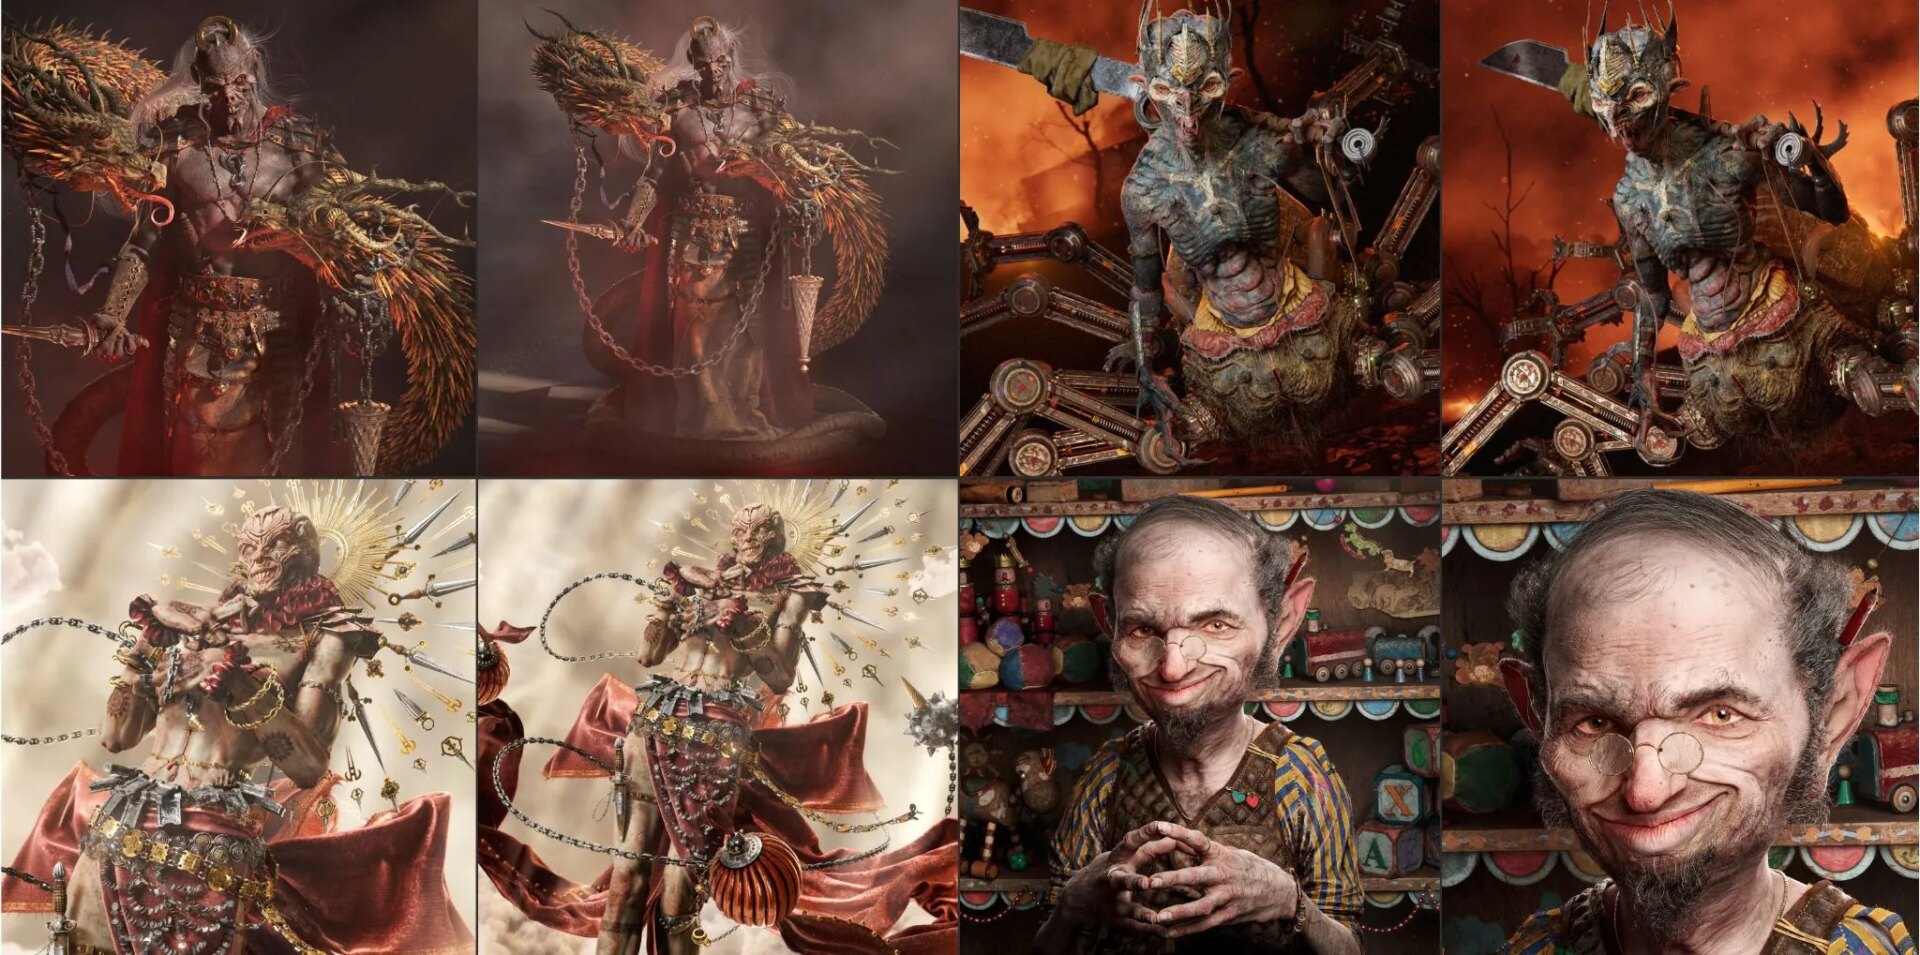
Since you’ve suggested showing some breakdowns, could you give us a sneak peek into one of your recent works? How did RizomUV contribute to achieving the final result?
One of my most recent personal projects is a creature called Belfa, it’s a concept I wanted to develop for some time. It’s a mixture of organic and hard-surface modelling with a lot of mechanical parts. This project contains quite a few objects and meshes and I can’t imagine I could’ve uv mapped so many assets in such a small amount of time without RizomUV.
I’ve modelled everything in Maya and Cinema 4d, sculpted the main character in Zbrush and then grouped everything into a Cinema 4d file to then render it in Redshift.
I usually export fbxs from C4d to RizomUV then uv map everything and use the same fbx to then texture it in Substance Painter or Designer.
RizomUV helped a lot for batch uv mapping some complex geos and correctly packing them for texturing. Especially for the mechanical parts I needed a clean uv, unwrapped and laid out in the correct axis so the textures could be seamlessly applied and look believable.
It was absolutely vital for the final output, it made a world of difference!
For artists looking to improve their UV mapping skills, do you have any tips or best practices when using RizomUV?
I’d say try and explore the program as much as possible, there are many features that are not necessarily visible in the default layout, that could help you a lot in your work.The texel density data that the program gives you basically on the fly is really important for the consistency of the uv islands, also the Selection and Constrain tabs are extremely useful so make sure to check them out!
Closing
Finally, what’s next for you? Any exciting projects on the horizon or areas of expertise you’re looking to explore further?
At the moment I’m working on a couple of personal projects as well as client work. In general I’m looking forward to what the future holds, these are really exciting times for the VFX and video games industry and I can’t wait to jump on what’s next!
I also wanted to thank you guys for the interest in my work throughout the years and for creating a really solid software that is making a visible impact in the industry workflows.